
Monday, July 22, 2013, 5:25 PM
My other big accomplishment for last weekend was purchasing a brand new, custom built trailer and pulling that trailer over the hill to our property in boulder creek. The trailer is going to be the foundation of my tiny house.
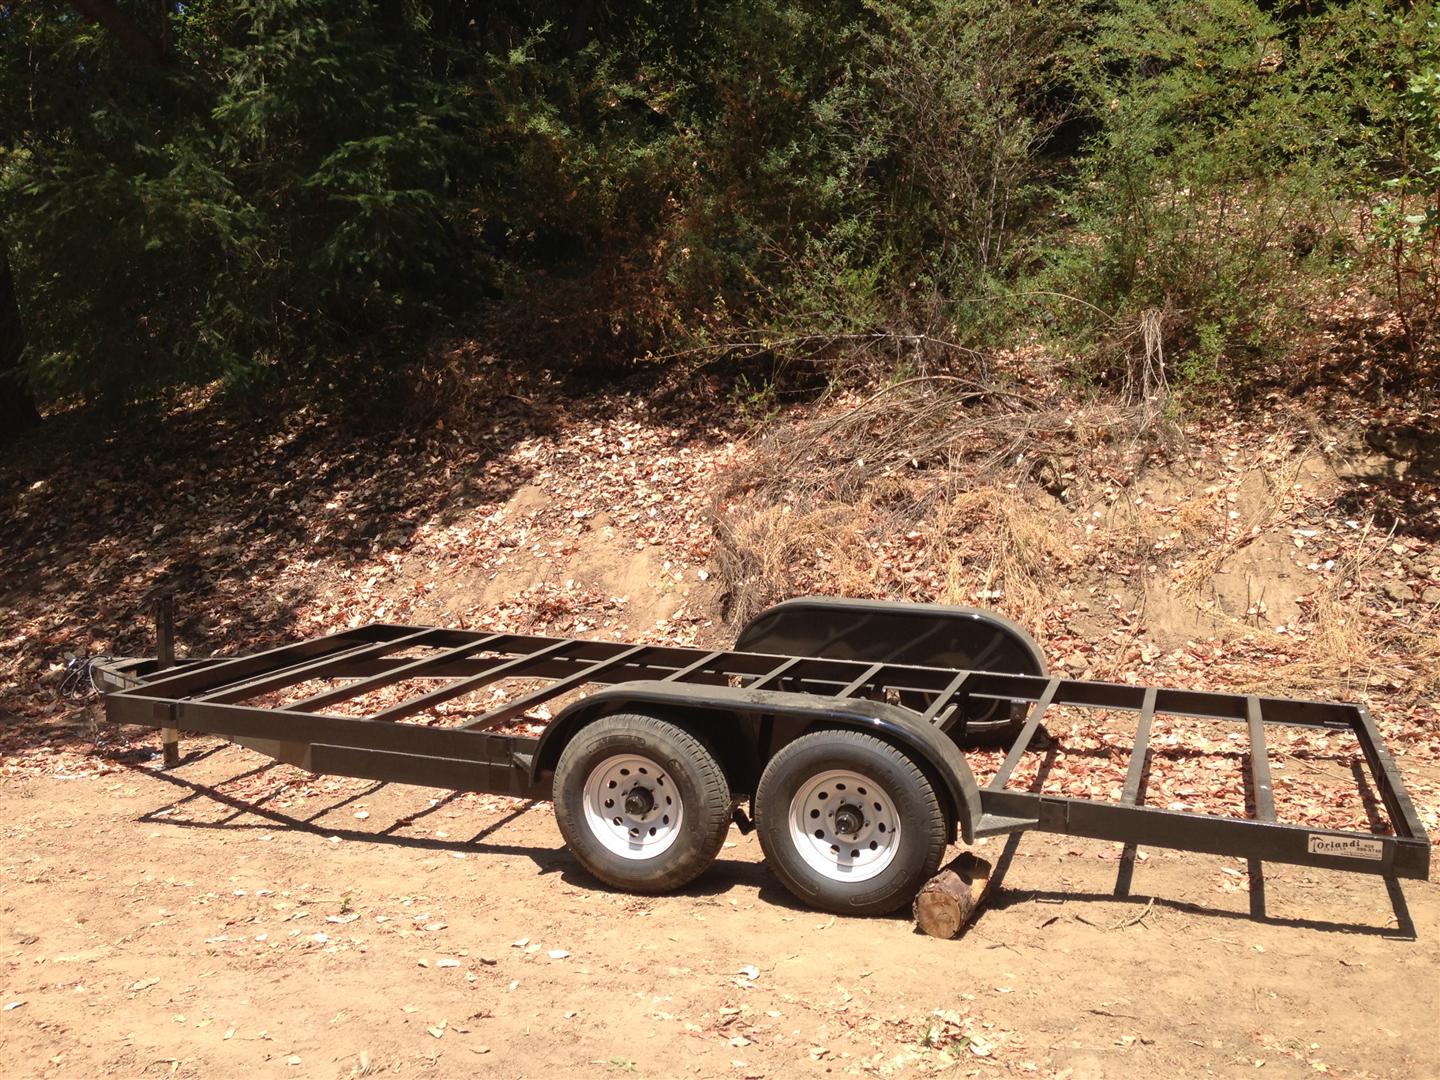
Trailer Parked at Property

Trailer
I have been looking for a trailer to build my tiny house on for quite a while. I took a good deal of time off during Lent and devoted to my tiny house project. I spent a lot of that time trying to find a nice used trailer, but really didn’t have any success. Eventually, with the advice of my friend, Andrew, from my bay area tiny house group, I decided to buy a custom trailer from a shop called Orlandi in San Jose. It was a little bit more expensive than a used trailer, but not much. The final bill was about $3000 with tax, title and registration. For me, the advantages of buying a custom trailer that was of good quality and exactly what I needed far outweighed the disadvantage of spending a little bit more money. For me, it’s very nice to know that I have a well built trailer that will easily be able to hold the weight of my tiny house while not requiring a lot of work to prepare.
Orlandi was very helpful. I told them what I was trying to do and as it turned out, I’m not the first person to buy a trailer from them for that purpose. After some discussion, we decided on the following specs:
- 7’x18′ trailer bed. The wheels go out to the legal 8.5′ maximum width
- Drop axles. This puts the trailer bed a little closer to the ground.
- No wooden deck (see more detail on this below)
- Everything on the frame flush and flat with no railings, lips, ramps or other metal material to remove. This way, the sub-floor of the house will be able to sit flat on the trailer frame.
- 10,000 pound gross vehicle weight (GVW). This should be more than enough to hold my house which together with the trailer will weigh approximately 7000-8000 pounds.
- Trailer brakes included and wired to a seven pin connector with a break-away cable (which locks the brakes if the trailer the taxes from the pulling vehicle)
- No lights installed. Orlandi told me that it would be better to position and install the lights after I knew where the house was going to sit. Otherwise, the house might cover up the lights. The trailer does not actually need lights as long as you drive it during the day and the lights of the towing vehicle are operational and visible.
Cost breakdown:
| Item | Cost |
| 7 x 18 10 K GVW bare frame, drop axles, fenders, electric breaks both axles, no lights, no deck | $2722.00 |
| break-away + 7 RV plug | $75.00 |
| CA registration fee (5 years) | $20.00 |
| Registration only (no title) documentation fee | $55.00 |
| California Tire recycling fee | $7.00 |
| Coupler lock (to lock the front of the trailer so nobody else can connect to it) | $89.95 |
| Primus brake controller | $169.95 |
| Brake controller plug wiring kit for a Toyota Tacoma | $18.99 |
| 2 5/16 inch ball | $19.99 |
| 8.75% tax | $275.70 |
| Grand total | $3453.58 |
Regarding the wooden deck, Orlandi convinced me that such a deck served no structural purpose and would only add cost and height. The tumbleweed plans that I purchased for my tiny house show it being built upon an 8’x18’ car hauler with a wooden deck. The plans requests that every other plank on the wooden deck be removed. I thought for a long time about why the plans specify keeping every other plank on the deck and I think I figured it out. Most car haulers come with a wooden deck that has a metal lip running all away around the outside (the lip keeps all of the wood decking in place). If you remove all of the wooden planks, then you’re left with a lip which rises above the frame and creates a final surface that is not flush with the frame. You would then have to saw off the lip or somehow build notches in the sub-floor to fit over the lip. If you leave half of the wooden planks on the deck, then you remove some of the weight while still keeping a flush, level surface to build on. Of course, none of this is necessary if you buy a custom trailer. In this case, you can circumvent all of these problems by having the trailer built with a flat metal frame and no wooden deck at all. That’s what I did and I think it’s going to work out very well.
Figuring out the specs for my trailer and ordering it was only half the battle. The next challenge was to get it to the build site. In this case, the building site is going to be a piece of property that we just bought in boulder creek. I thought about trying to rent some warehouse or parking lot space near my house to build at. However, I eventually decided that this would be an unnecessary expense. I decided I would rather take the money I would spend on renting a building spot and use it to build up the infrastructure of my property, including connecting up the well, buying a generator, building a shed, buying tools, etc. If I build my house at my property, then I don’t have to move it when I’m done. Finally, building my house at my property allows me to actually spend time at my property which I enjoy.
I don’t own any vehicles that can pull something this big, so to get my trailer to the property, I decided to borrow friend’s truck. My friend, Dave, was nice enough to loan me his Toyota Tundra. Unfortunately, as I quickly discovered, just owning a truck with sufficient towing capacity is not enough to pull a trailer like this. In order to actually use the brakes on the trailer (which is legally required for any trailer that has brakes installed), the truck also needed a seven pin trailer plug and a brake controller. Luckily, my friend’s truck had a seven pin plug factory installed and also had all of the wiring required to add the brake controller. That meant all I had to do was buy a brake controller and pay Orlandi to install it. That cost me about $200 and about ½ hour of time waiting for them to install it. I also had to buy and have Orlandi install a larger ball that was the right size for the trailer hitch. With all of this done, Orlandi was able to finally connect the trailer to my friend’s truck at which point it was up to me to drive it off the lot.
Before I left, they gave me some final instructions on how to use the brake controller. It is actually a pretty neat device. It hooks up to the wiring of the truck and receives an electrical signal when you press the brake. However, it does not know from the wiring how hard you are pressing on the brake. It figures this out using an accelerometer within the unit. The more deceleration the controller senses in the pulling vehicle, the more voltage it sends to the trailer brakes. In addition to the accelerometer, there is also a dial that controls the gain. The higher you turn the dial, the stronger the trailer brakes become in proportion to the deceleration of the vehicle. For me, since I was pulling an unloaded trailer, Orlandi recommended that I set the dial to the lowest setting to prevent burning out the trailers’ brakes.
It’s been a long time since I’ve driven a trailer. I did own a medium size trailer that I used for my lawn cutting business in high school, so I do have some experience pulling trailers as well as backing them up. Although the trailer I purchased was bigger than anything I have dealt with before and it has been a while, I was fairly confident that I could drive it myself. I knew I was taking a small risk doing this, but I felt like the risk was acceptable.
As it turns out, pulling the trailer was not all that difficult. It was very smooth to drive and followed the vehicle very well. The truck was so powerful that if I wasn’t paying attention, I could almost, but not quite, forget that I was pulling a trailer at all. I also discovered that I had not forgotten all of my backing up skills. With a little bit of trial and error, I was actually able to successfully back the trailer into my tiny, 20’ driveway, disconnect my vehicle and store the trailer there overnight. So far, so good. Of course, driving on flat expressway is a whole different matter than hauling a trailer up the narrow, winding, hilly roads that lead from my house to my property
Hauling the trailer over the hill was my adventure for the next day. After loading the truck with all of the supplies we needed to spend the weekend, I carefully backed the truck up until the ball was located exactly under the hitch of the trailer. I then lowered the trailer, locked it on, plug it in and connected the chains and breakaway cable. Then we were off.
The nice thing about the 25 mile journey to my property is that the difficulty level relative to towing a trailer slowly increased the closer I got to my property. This gave me some time to get used to driving in one condition before attempting a new challenge. First, there was flat the freeway. That wasn’t so bad. Then, there was the first part of the freeway up the hill. That was narrower and made me a little bit more nervous, but was still doable. Next was road up the hill. That was more complicated. It was much steeper and even narrower than the freeway. I had to pay attention all the time to exactly where the trailer wheels were to make sure that they did not cross the yellow line too far on the left or run into the rocky cliff on the right. The little prayer I said to God before I headed up this hill seemed to work as the trailer made it to the top of the hill without incident. Heading down the other side of the hill was about the same as driving it up the hill except that the trailer brakes got a lot more use. The brake controller seemed to do its job well.
I breathed a sigh of relief when I finally got to the dirt road leading to my property. I knew I was close now. However, the trickiest part was still to come. The dirt road was full of potholes and bumps. I was worried about this, but both the truck and the trailer took the uneven road in stride. The next obstacle was the dilapidated, creaky bridge across the creek. Since the bridge was only 10 feet wide, I had only 1.5 feet of margin on either side of the 8.5 foot wide trailer. I took it slow, headed for the center of the bridge and successfully got the trailer across.

Scary Bridge at our Property
Next up was the even smaller, even bumpier dirt road into our property. This is when I decided that four wheel drive might be nice. I don’t think I have ever fully appreciated four wheel drive on a vehicle before this moment. I’m not sure I could have gotten the trailer any further without it. It worked flawlessly. I simply punched the four wheel high button and off I went up the hill. The truck didn’t even struggle.
A few minutes later, I arrived in the main clearing of my property at which point, I jumped out of the vehicle, stuck my hands and the air and yelled a whoop of success! Having purchased a trailer and pulled it to my building site, I am now one step further towards building my tiny house and that feels pretty amazing.
