
Saturday, March 22, 2014
Today, I was again blessed with another good sized group of people (even my tiny helpers, Bricye and Anthony showed up) who helped me to accomplish an incredible list of tasks culminating in the installation of the loft.
Who helped today:
- Sabine
- Adrian
- Evelyn
- Bryce
- Anthony
- Joy
- Sheila
What we did today:
- Crawled underneath the trailer and installed the lag bolts that connected the frame of the trailer to the frame of the floor. This was a three step process involving first drilling a pilot hole, second adding a small dab of silicone to seal the hole and third screwing in the lag bolt. This was not a fun job since it was in a tight space. However, the process was helped a great deal by placing a tarp down on the driveway underneath the trailer which made it easy to slide around under the trailer. I started this job, and successfully ‘Tom Sawyered” Sheila into finishing it!

Sheila Bolting the Trailer to the Floor
- Sabine sanded the three sides of the 4×4’s that would support the loft and be visible from the kitchen
- Joy and Sabine installed the 4×4’s and all the 2×4 and plywood spacers required to form the frame for the ceiling
- Adrian and Anthony found a way to install the final HDU-4 tie down in the right wall which was unfortunately buried between two 2×4 studs (see problems we encountered below)
- Evelyn painted the edges and underside of the plywood along the bottom of each wall in order to seal that plywood and protect it from moisture
- Adrian and Bryce finished nailing the plywood from one wall into the frame of the adjacent wall at each corner
- Evelyn and Anthony finished nailing the plywood at the bottom of each wall into the floor
- Bryce seemed intent on cleaning up just about every bit of sawdust (aka pixie dust) that existed anywhere in the garage or in the tiny house (he can come back any time!)

Bryce Sweeping the “Pixie Dust”
- Sheila wrapped the CS-14 strapping sticking out from the ends of the left and right walls around the corners and nailed it to the front and back walls. This was especially difficult on the rear wall since the rear wall already had a strip of CS-14 embedded in the wall directly underneath the CS-14 strapping we were trying to install. That meant first drilling holes through the CS-14 strapping in the rear wall before nailing the new CS-14 strapping into place
- Sheila and I installed all of the tongue and groove pine 1 x 6 strips into the loft. See below for more detail on this.
- Sheila and I started to install the riser that I have decided to use to raise the ceiling by a few inches to give us a little bit more space in the loft. I’m installing the riser by gluing and nailing a stack of two 2×4 boards at the top of all four walls, overlapping the 2×4’s so the seams are at different places. The total height of the house will still be less than the legal limit of 13 ½ feet.
- Sheila and I put my giant 20 foot by 30 foot tarp over the top of the house in preparation for the rain we are expecting on Tuesday.
Notes regarding the loft
I made a few design changes to the Tumbleweed loft plans that I think made it a little bit cheaper and much easier to install. The plans call for 18 1”x6”x10’ white pine tongue and groove strips for the loft. However, I found a way to create the loft with only 17 1”x6”x8’ white pine tongue and groove strips. Most large hardware stores (like Home Depot or Lowe’s) only carry the 10 foot lengths of the pine tongue and groove. However, I discovered that my local hardware store, Pine Cone Lumber, carried pine tongue and groove in just about any lengths I could want (8, 10, 12, 14 and 16 feet). The loft is 8 feet 3 ½ inches long. However, the front 1½ inch (closest to the front of the house) is made up by a single pine furring strip. The back 2 inches is buried within the back wall and this space can be filled with a 2 inch strip of ¾ inch plywood ripped on a table saw. The space in between the 2 inch strip of plywood and the 1½ inch furring strip is exactly 8 feet which is the length of the tongue and groove that I bought. That meant that I didn’t have to cut any of the tongue and groove strips, which was a great time saver.
Two more furring strips allowed me to reduce the number of tongue and groove boards from 18 to 17 and have them nicely centered across the loft. The house is exactly 88 inches wide. Each 6 inch piece of tongue and groove actually covers 5 inches (after the groove of one board is hammered into the tongue of its neighbor). 17 boards cover exactly 85 inches. If the 17 boards are centered, that leaves exactly 1½ inch of space on either side which can be filled with a 1×2 furring strip.
If you have access to it, a pneumatic finish nailer is perfect for this job (thank you, Joy, for loaning me yours!). You can certainly accomplish this job with hand nails. However, I would not have wanted to.
With the above design modification, installation is fairly straightforward and surprisingly quick. Here is the process:
- Create a small chunk of two by four with a notch cut out of it to use to hammer each strip into place. If you have it, a scrap piece tongue and groove pine will also work well for this. Since I didn’t have to cut any of my tongue and groove boards, I didn’t have any scraps to use.
- Cut a nice pine 1×2 furring strip (actually ¾” x 1 1/2”) 88” long. Sand on two sides.
- Glue and finish nail the 88” furring strip at the front end of the loft with the sanded sides showing up and towards the door. The furring strip should be flush with the front of the front most 4×4.
- Install an 8 foot furring strip along the right side of the loft, flush against the plywood on the wall.
- For each loft board, add a small amount of glue to the top of each four by four (just enough for the single loft board being installed and not so much that it will squeeze out the sides and be visible in the kitchen ceiling).
- Install the first piece of tongue and groove so the groove is against the 8 foot strip and the front butts up against the 88 inch strip. Install the loft board with the nice (smooth) side facing down (the nice side will form the kitchen ceiling).
- Nail the groove side of the loft board place using three finish nails at each 4×4. Place nails about ½” in from the furring strip. These nails will be hidden in the wall.
- Nail the tongue side of the loft board in place using three finish nails at each 4×4 placed right at the seam between the tongue and the rest of the board. Install the nails at a slight (~15°) angle pointed towards the groove side.

Nailing Loft Boards in Place
- Add a small strip of glue and install the next board, using the notched 2×4 and a hammer to push the groove of this board tightly into the notch of the next one. Take care to make sure the front of the board is pressed up tightly against the furring strip at the front of the loft before hammering into place.
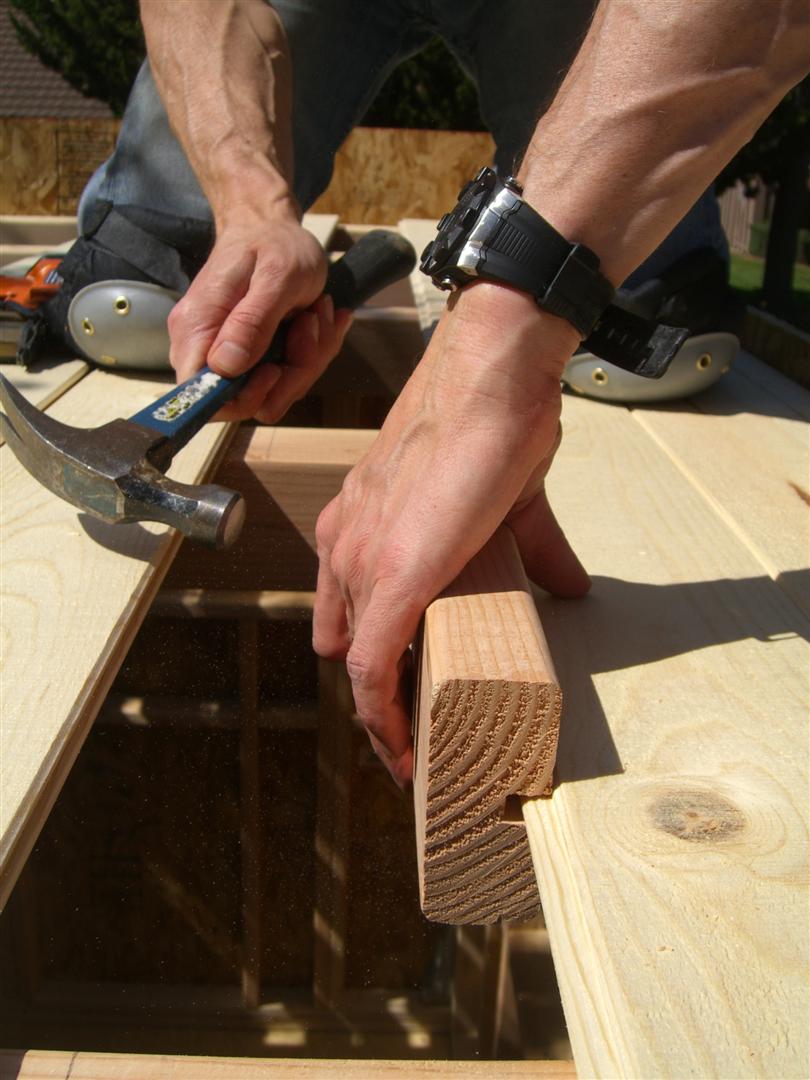
Hammering Loft Board Into Place
- As with the prior board, nail the tongue side of the loft board in place, again using three finish nails through the tongue at each 4×4.
- Continue until all but the last loft board has been installed.
- The final loft board will need to be trimmed using a table saw to fit the remaining space between the second to last board and the wall, leaving 1½ inches for the remaining furring strip. About ½- ¾ inch on the tongue side will need to be cut off.
- Install the final 8’ furring strip on the left side of the loft
- Measure the space between the back of the loft boards and the edge of the back wall (will be about 1 ½ – 2”). Cut a strip of ¾ inch thick plywood to fill that space. Make the strip 88 inches long.
- Finish nail the ¾ inch strip plywood along the back of the loft.
- You have now finished installing your loft!

Loft Complete!
Problems we ran into:
- Installing the final HDU-4 tie down was a bit tricky. The space between the two by fours surrounding the HDU-4 tie down would not allow space for any kind of tool. My idea had been too cut out a section of the two by four that was in the way, pry it off the nails and glue that attached it to wall plywood, install the tie down, replace the cut out piece of two by four and add a sister piece of two by four for structural integrity. Adrian had a much better idea. He simply drilled a bunch of holes in the two by four, attached two drill extension bits to the drill and used those to install the bolts through the holes. When he was done, he still added a sister piece of two by four for structural integrity. If I build another tiny house, I will be sure to install the HDU-4 tie downs into both walls as the wall is assembled (like I did for the left wall, but did not think of in time to do for the right wall).

Adrian and Anthony Installing HDU-4 Tie Down in a Very Tight Space
Favorite parts of the day:
- My favorite part of the day was holding our first dinner party in the tiny house. For lunch, we laid a tarp down inside the house and everybody sat on the floor to eat pizza and salad together. We even positioned a few of the loft boards in place on the ceiling to provide us with a little bit of shade.

First Meal in Our Tiny House
- Sitting up on the finished loft together with Sheila at the end of the day, basking in what we had accomplished together with our friends this weekend.

Sitting on Our New Loft!
